Kaltura LTI 1.3 User Guide
Media Gallery
Note: Media Gallery is only found within the course itself.

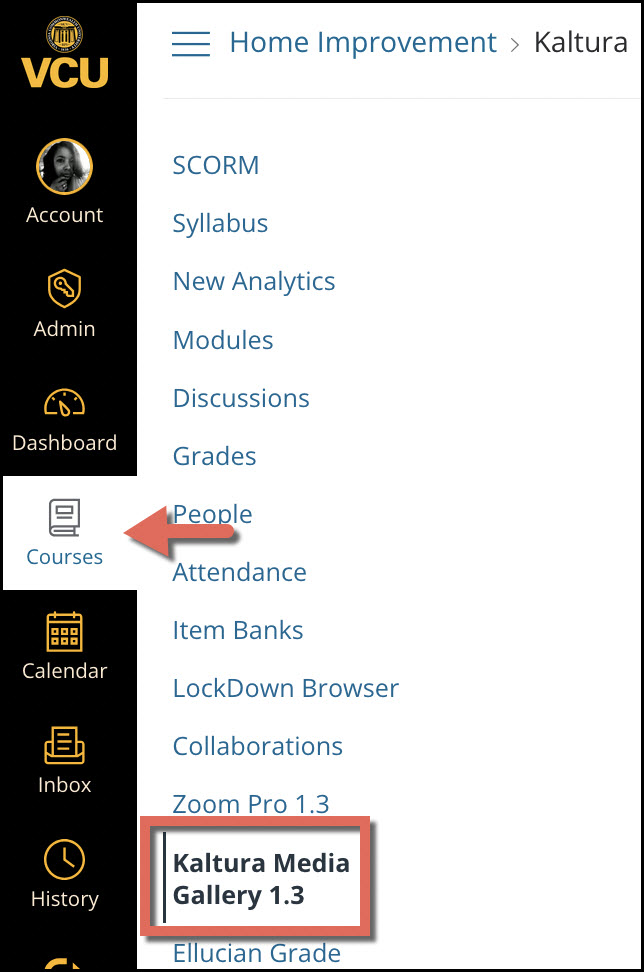
To access the Media Gallery, go to your specific course navigation menu and select Kaltura Media Gallery 1.3.
Media Gallery Features

- Filters Sorting - This allows the sorting of media type, duration etc.
- Search In - For this box, insert some text then press ‘Enter’ which will allow you to use the “Search In” function.( i.e. search name, description, tags etc.
Note: You can have both the "Filters" and the "Search In" drop down active at the same time. - Sort By - This field is where you sort by date, relevance, etc. to search text.
Note: You can have both the "Filters" and the "Sort By" drop downs active at the same time. - Contrast Mode - This button is an accessibility feature which brings out text and button colors for easier viewing.
- Channel Actions - This is a button allows access to the “edit”, “analytics”, “services ordering” and “create channel playlist” options.
- Edit - This area allows you to change the description and tags of your current media gallery in the course. However, this is a function that is only searchable by an upper level admin so it does not see use. Instead, we would advise channel creations to achieve a similar outcome. In this area you can also manage any playlists you’ve created within this specific media gallery.
- Analytics - This button will give you access to analytics for this courses media gallery such as; total time viewed, top video viewed, top viewers etc.
image goes here - "Media Gallery Features 2" - Services Ordering Rules - This button is for requesting Live captioning which we have an official process for. If you wish to request additional information about this, please email lsrequest@vcu.edu.
- Create Channel Playlist - This is for creating channels within your media gallery of your course, we advise creating channels within VCU’s Kaltura Mediaspace as it may be easier to build them there.

- Grid View - This button is for displaying your videos in the course in a grid type view.
- Detailed View - This will display a thumbnail of your video with a short description beside it.
- Collapsed View - This button shows your videos in a standard list without thumbnails.
My Media
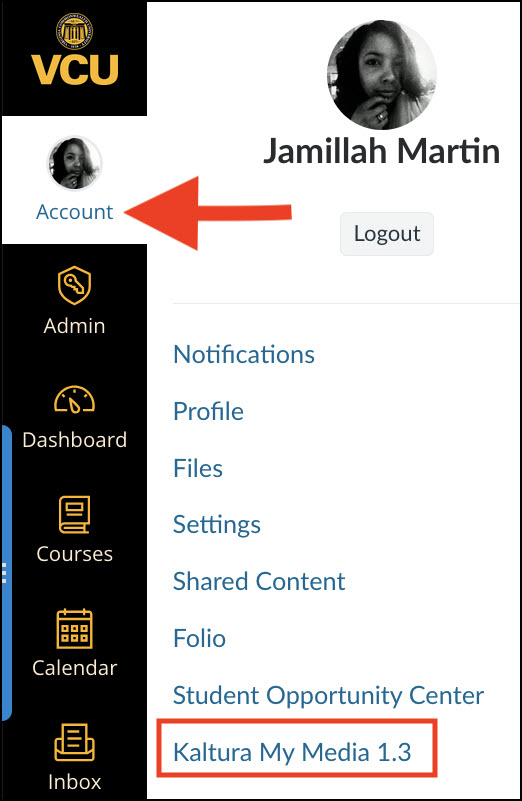
Note: My Media is found using the Account Profile menu as seen below.
To access the My Media, go to your Account navigation menu in the top left corner and select "Kaltura My Media 1.3".
My Media Features

- Watch List - This button within the course is primarily for student use as you can’t add your own videos to a watch list. What this does though is allows users to save videos for view later.
- Add New - This drop down menu gives you the options to add the following media types that will be covered.
Note: This is also the same as the + Add Media button you would have seen in the Media Gallery earlier. - Media Upload - This option allows you to upload files from your computer, these can include just audio, video or image files.
- Express Capture/Webcam recording - These both have the same outcome they open your webcam up for a quick video/audio recording to post to the course.
- YouTube - This allows you to import a YouTube video into Kaltura.
Note: YouTube is the only currently supported video platform you can do this with. - Kaltura Capture - Using this option will launch the Kaltura Capture software if you have it installed on your computer. This is the more advanced capture software that allows you record presentations while also having your webcam active for students to see We have information on Kaltura Capture here: https://learningsystems.vcu.edu/kaltura/capture--caption/kaltura-capture/.
- Video Quiz - This option allows you to select a video that has been uploaded and add quiz questions which can be graded.
Test Video Playback
Once you have uploaded different types of media, even if it’s only one or two, you should try viewing the videos in the course to ensure they work properly.
Mediaspace Testing
All videos that you have uploaded at this point should have simultaneously uploaded into Mediaspace. Login and double check the entries: https://vcu.mediaspace.kaltura.com/